Wednesday, November 5, 2008

Dude's Des(s)ert Double

Forgive me father for I have sinned. It has been over a week since my last confession…no wait, I mean my des(s)ert day. I have not updated the blog within the pre-ordained 1 week deadline, so I stand before you (really I am sitting at my laptop) begging your forgiveness. Working in my favor is the fact that I actually brought in two desserts.

The week before my turn came up, I traveled to England for my Grandfathers funeral. I have a lot of family in England and several of them were nice enough to provide us with lodging and some delicious meals. Each of those home cooked meals was followed by a fantastic dessert. I had my first taste of Crème Brule (which was homemade and terrific), some kind of apple pie/tart/crumble (also awesome), and the most “right up my wheelhouse” dessert of all time; Treacle tart.

For those of you who don’t know, Treacle tart is essentially “sugar pie”. Being the lover of sugar that I am, I can tell you that it was friggin’ delicious. I decided that I would learn how to make one. Here’s how it goes.

First, you have to find something called Golden Syrup. I (actually my lovely wife) found it in the British section of our local supermarket. Golden Syrup is a byproduct of the sugar refining process. It has about the consistency and sweetness of honey, but not the “honey” taste. To make a Treacle tart, take equal parts of Golden Syrup and white, unseasoned breadcrumbs (1 cup of each) and mix them in a bowl. Add a small amount of lemon juice and a little bit of lemon zest (I used the zest and juice of one small lemon). Pour the mix into a pastry crust and bake at 350F for about 20 minutes. I left mine in the oven for about 30 minutes, and it was over done. There is nothing in the tart that needs to be cooked, so don’t worry about under cooking it. The gooeyer the better.

Once the Treacle tart was done, I became worried that it would not go over well with my very American audience. Therefore I decided to make a second more American dessert, Dutch Apple Crumble. Smell that? That’s irony.

Fortunate for me, the Dutch apple crumble also has a lot of sugar in it, maintaining it’s “in my wheelhouse” status. To make the apple crumble, you will need 4-6 apples, thinly sliced. There should be enough apple slices to slightly over-fill whatever pie plate you want to use (Pyrex or Corningware work best). To the apple slices, add 1/4 cup of white sugar, 1/3 cup of brown sugar, and 1/4 teaspoon of cinnamon (more or less if you prefer). Stir up the apple/sugar mix and pour it into the pie plate. For the crumble you will need 1 cup of flour, 1 cup of white sugar, 1/4 teaspoon of baking powder and 1/4 teaspoon of salt. Mix up the dry ingredients, and the “press” in a stick of butter (or in my case 1/2 cup of vegan margarine). As the butter mixes in the “stuff” will become a little sticky. Use your hands to press it together into small lumps and then break (crumble) them up. Pour the “crumble” over the apple/sugar mix and then bake at 350F for about 30 minutes. You want the crumble on top to brown but not get too hard. The apple mixture will boil and shrink, so don’t worry if the pie plate is over-filled; the whole thing will shrink. The end result will be a squishy on the bottom, crumbly on the top, pie plate full of appley sugary goodness. Enjoy.

Wednesday, October 22, 2008

Chocolate Cream Pie

So this time around I didn't realize it was my turn for desert until yesterday afternoon. By the time I got home, the bakery I planned on going to was already closed, so that'll have to wait for another time.

Anyway, I was out almost all night so I squeezed in a trip to my local Stop & Shop for a baked good or two. What I found was a special little treat called chocolate cream pie. Now, I had never heard of chocolate cream pie - only banana cream pie like on Sesame Street. But in the true spirit of Dude's Desert Day I decided to try something new (and hopefully delicious).

The chocolate cream pie looked like a pie crust, heavy pudding, whipped cream, and then chocolate bits and pieces on top. Overall, it was pretty tasty - and Denbo said it was 'delicious.'

Wednesday, October 15, 2008

Bova's Bakery - Cannoli's and Eclairs


Driving home last night I was running over in my head the various options for desert day. Could I beat out famous W's Key Lime Pie? Could I lay a smack down to some tiramisu? What sort of wizardry could run circles around the workings of Drew's Nicki? That's when it hit me...Bova's bakery has the workings of a serious competitor and thus was my only option for a desert that did not have the passion of one made from scratch. So off I went...


I first saw the sign in the distance with it's neon glow "Open 24hrs!"... you never know when you need a serious desert.


I was greeted by the friendly faces of the BOVA's staff...


And then of course the variable selection of delectable treats...

The selection was immense with the aroma of confectionary sugar and Italian pastry that was glorious and mouth watering. It was a venerable cornucopia of desert greatness. It was a difficult decision and with my car double parked I was leaning towards cannoli's...then I noticed the delicious éclairs on the bottom row. It was a toss up either way and I couldn't decide...but wait! This is America...and in America I do it my way, check all those boxes people! I'll take em both! And thus we had another great desert day... :)

Tuesday, October 7, 2008

Tiramisu - The Stuff Dreams Are Made Of

So, last post was... 9/15? That would be, what, 3 deserts ago! I hate to say it, but maybe those deserts were, um, just not worth writing about. Hey, don't blame me, I can only assume. But I'll tell you what it means to me to be a desert dude - It's all about this DDD. Okay slackers - Pay attention, this is how it's done.

Having just returned from China last week, I find myself craving an afternoon pick-me-up pretty much every day. As luck would have it, tiramisu is Italian for, well, "pick-me-up," so it seemed the natural choice for me to bring in for desert day this week.

Tiramisu

4 eggs, salmonella free*
1 c heavy cream
1/2 c + 2T sugar
8 oz (or 250g) Mascarpone cheese
1 T vanilla extract**
2 T hooch of some variety, if so desired (Kahlua, brandy, cognac, amaretto, etc.)

1 pkg (7 oz) Savoiardi lady fingers (about 30 pcs)
1 c fresh brewed espresso***, chilled, with 1T sugar added
1 oz good quality dark chocolate

Notes:
* Yes, this contains raw eggs. Deal with it.
** I would advise against using the immitation stuff.
*** Don't even think about that powdered stuff. Just stop.


Let's get this started.
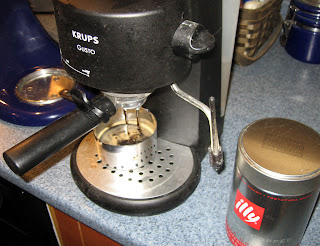
Brewing Illy Espresso - Hey, if you're going to go to all this trouble, use some good coffee, right? This should be brewed ahead of time and stashed in the fridge.


First objective: Make 3 'batters' and then combine into 1

'Batter' #1 - Zabaglione/Mascarpone
This is the most difficult of the 3, and probably the most difficult part of the whole process. So relax - it gets easier after this. Place 4 egg yolks (separate and save the whites in the fridge for later), 1/2 c sugar, vanilla, and hooch (if using) into a double boiler. Hey, I don't have a real one either, so a pan of water and a stainless steel bowl will work just fine. Whisk over simmering water until the mixture starts to thicken up (about 5 minutes or so). You will know it's done when you can scoop some up and drizzle it back into the bowl and the surface ripples hang out for a couple of seconds before disappearing.

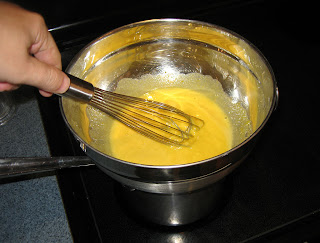
Egg yolks, sugar, vanilla over a double boiler.


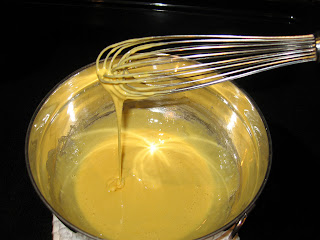
Notice how much this has thickened up - you can see the drizzle piling up on itself. Remove from heat before you kill it.


In a separate bowl, pre-beat the mascarpone cheese with a hand mixer. Combine the two together, using the hand mixer. When uniform, stash in the fridge.

Add in mascarpone cheese.


Look how smoothly they are incorporated with each other.


'Batter' #2 - Whipped Cream
Clean off your hand mixer, you're going to fire it up again. Whip heavy cream and 1T sugar until it forms "stiff peaks." Insert joke here. Set aside. See, that was easier, right?

Whipping the cream...


until you get stiff peaks. Dip the beaters into the whipped cream and turn upside down. The peaks shouldn't droop.


'Batter' #3 - Whipped Egg Whites
I like to whip my egg whites (yeah, I'm dropping that all casually like I do it all the time - got a problem with that?) in a stand mixer, rather than with a hand mixer. Sure, you can use either if you like, but a word of warning - you MUST use clean beaters. One tiny blob of fat in there, and all you will have is a Rocky Balboa smoothie. Same goes for bits of yolk. If you screw that up when you separate the eggs, just hit the reset button. Eggs are cheap. Unless of course... Oh goodie! Time for an egg rant!

I couldn't help but notice the witty banter on this blog about this volitile firestorm of a subject. So where do I stand on the great egg debate? If you know me at all, you are right to assume that it all comes down to taste for me. Which boils down to buy fresh, high quality eggs. A word about safety - By now you know that you are going to be eating (and serving, if you're making this) raw eggs. Estimates put the odds of salmonella contamination at about 1 in 20,000. How can you reduce your risk? Well, don't buy eggs with feces on them, for one. Generally, mass market eggs are more likely to be contaminated than those from cage-free and organic farms, the idea being that closer quarters allow for a greater likelyhood of waste ending up on the egg at some point (1 point for Dags). I have few rules in life, but one of them is to eat as little fecal matter as humanly possible. If you want to be totally safe, use pasteurized eggs. Of course that is, if you can find them. Since none of the dudes present are either infants, elderly, or pregnant (at least, as far as I know) I went with "naturally farmed eggs" and am resting easy. Bottom line: If you're a hard core baptized believer, raise your own chickens. Or get your eggs from someone who does.

Now that I've got that off my chest, where was I? Oh yeah, whipped egg whites. Let's try that again.

'Batter' #3 - Whipped Egg Whites
Whip 4 reserved egg whites with 1T sugar using a mixure of your choice, until egg whites are stiff (even stiffer than the whipped cream - insert even lamer joke here). If you want to prove your manliness, use a whisk and do it by hand. Just don't say I didn't warn you.

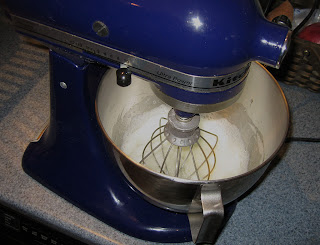
I prefer to let the stand mixer tackle this.


Turn it on to max speed and let it go for 3 minutes or so to get stiff egg whites. But don't let it run too much or they will reliquify.


Now we're set with our 3 'batters' and ready to roll.


Time to combine the 3 'batters' into 1 mixture - but not so fast. We spent all this time whipping a ton of air into these 'batters' so that they would be fluffy and light. It would be a shame to spoil all that work and deflate them now by mashing them together indiscriminately. Instead, fold them together, starting with the whipped cream into the zabaglione/mascarpone. What is folding? If you care, check this demo out. If you don't, well, there's some unintentional comedy there, so you might want to check it out anyways.

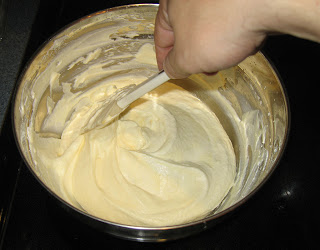
Notice the swirl pattern, characteristic of the folding technique.


When these two are combined uniformly, then fold in the egg whites in like manner.

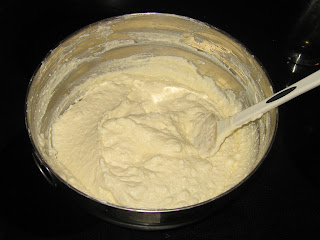
Complete and ready for assembly.


Now the fun begins.

Second objective: Assemble the tiramisu

Get your work area organized first, you'll thank me later. Get out the batter mixture, the cold espresso, the lady fingers, a large rectangular vessel of some type with at least 4" high walls, and a rubber spatula. The process is simple, basically alternating layers of the cream with espresso soaked lady fingers.

Start by coating the bottom of the dish with a 1" layer of the cream mixture. Next, it's time to take the lady fingers, hit them with some of that espresso, and layer them on top. But first you need to know about the soak test.

You see, all lady fingers are not created equally. Of particular interest is how quickly they absorb liquid. If they get too waterlogged, they will fall apart and the tiramasu will be soggy. Too little espresso, and they will stay hard and crunchy, which is not the texture you want in tiramisu. It seems like every tiramisu recipe has a different method and timing suggestion for how to dip the biscuits into the espresso, but this is meaningless unless you know what you're dealing with. To me, it's worth it to sacrifice one of your biscuits to run a quick little test. Break one lady finger in half, and dunk into the espresso, turning it over every 1 to 2 seconds. Take care not to completely submerge. You want to get good ring definition to gauge the penetration rate (um... absolutely no comment). For the stuff I bought, it took about 5 seconds (rotating every second or so) to get the right amount of coffee into my biscuits. You will need to adjust this timing for your materials.

This is the crossection I'm looking for. Since this will be sitting overnight in the fridge before serving, I want to make sure that there is a little bit of dry biscuit to absorb moisture. This will help the final product set up nice and firmly. If this were totally soaked, the tiramisu would be watery and the coffee taste probably a bit too strong.


So dip, shake off the excess, and place in a layer. Cover with cream, and repeat, this time with the lady fingers going in the perpendicular direction (big words). Cover with another layer of the cream. Let sit int the refrigerator overnight. This will allow the ingredients to set together, making the perfect consistency for the finished product.

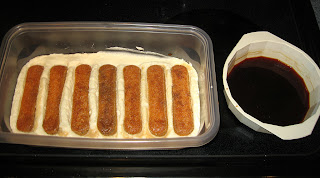
Rack and stack. Alternate direction for next layer.


Immediately before serving, it's time to apply the coup de gras. Using a fine grater, shave chocolate over the top of the tiramisu. If you are unambitious and want to take the easy way out, use cocoa powder. But hey, if you made this from scratch, the least you can do is get some decent chocolate to throw on top.

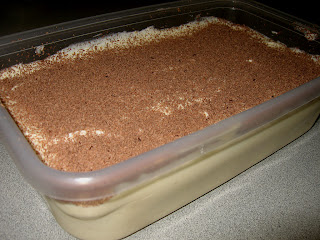
Finished Tiramisu - Tableside chocolate shaving always goes over well.


Now that's what I'm talking about. As with most culinary feats executed by the male species, this one will certainly impress the ladies. Dudes? You're welcome.

Monday, September 15, 2008

Lemon Squares


Welcome to the better-late-than-never wrap up of my Desert, Lemon Squares. Like this very posting, the making of this desert was delayed by a heavy dose of procrastinating due to the struggle that was my move.

I typically like to try and mix things up a bit when my turn comes around. Prior to my turn, there were (as you can see in this very blog) several selections that were very rich and/or chocolatey. After a little deliberation (read: looking around the baked goods aisle at 9 PM on tuesday night) I settled upon Lemon Squares. I had initially wanted to do something a little more homemade, but due to a lack of time (again, the move), resources (my sous chef living at school during the week), and experience (my first time using the stove in my apartment, which is much different than my old one) I resorted to going the boxed way.

When I got home from the store, I put the groceries away such that I could watch TV and fall asleep on the couch for a bit (the desert selection process left me very tired). I woke up later and realized I had to get cracking, so i started mixing the eggs (egg beaters, actually- we're very cholesterol conscious) with the lemon mix. I then went to heat up the oven per the instructions. This is where I realized the fatal flaw in the industrial design fiasco that is the face of my oven: the different temperatures are listed on the knob in 25 degree intervals, which is par for the course. However, with a setup like that, you would expect a line that points to the temperature to be painted on the face of the oven behind the knob such that it could let you know what the temperature is set to while you bake. Unfortunately, you would be wrong, as the geniuses that designed my stove thought that it would make more sense to have the aforementioned be painted on the knob itself, pointed directly at... 0°. Fantastic. So i went out on a limb and assumed that the temperature setting should be at the top and adjusted it to what i believed was 350°, but honestly I have no idea how close to that I was.

It was at this point that I went to my bedroom to check my wallet to make sure that I had cash so that I could buy some cookies for everyone during lunch break the next day to make up for what was sure to be a lemony desert disaster.

So i go back in the kitchen and put the crust mix in the (newly purchased) 8" x 8" pan and then into the oven, which I could only hope was in the right temperature range. After letting the crust bake for about 5 minutes, the lemon mix is then poured in and the whole thing is baked for about 20 minutes. I then took it out, and to my amazment it was actually cooked properly (i.e., wasn't burnt or still liquid). I let it cool off a while by the window and then cut it into small pieces as to fit into tupperware.

I tried a small sliver of one and thought it was pretty good, but could use a little something extra. I then grabbed the powdered sugar and applied at a nice variety, from Jon-level coating (a slight sprinkle) all the way to Dags-Level (heavy dousing).

Desert the next afternoon went pretty well, with nary a leftover square. Thanks for reading, and thanks to Jon's fancy iPhone device for the stunning hi-resolution picture above.

With Warm and Delicious Regards,
Steve

Wednesday, August 27, 2008

Unhealthy Chocolate Cake

OK, so in the spirit of wanting to be more like Drew I bought an iPhone (actually it's a birthday gift) and had my girlfriend (not fiance) bake for me. Unlike Nicki, Sarah is not a nutritionist, so she decided to make a chocolate cake and substitute unhealthy alternatives wherever possible.
I don't know exactly how she made it, because I was busy watching the Sox game and drinking beer. But I do know that it involves 4 eggs (extra cage & hormones for Dags), lots of chocolate chips, sour cream for some reason, and cake and pudding mix or something. Then it went into a funny shaped bowl (seen below), the oven for 1 hour, then my mouth (that's what she said).
After baking I sprinkled it with confectioner's sugar (my own touch) and that was that.

Wednesday, August 20, 2008

Peanut Butter-Chocolate Pie

Let me officially welcome you to Dude’s Desert Day. Yeah, it’s spelled wrong. It’s still delicious! And in my case has poor grammar and spelling. Since no one actually bothered to explain what Dude’s Des(s)ert Day is, allow me. One fine day, our founding father (know simply as Dubs) took a break from his speed-walking and decided to grace us with both his presence and a home-made key lime pie. At the time some of us (well me specifically) had never had a key lime pie. Needless to say, it was delicious. Someone (me thinks it was S.Dot) said “We should do this every week!”, and thusly Dudes Dessert Day was born. Notice the correct spelling, since you can not spell something wrong when you say it. The origin of Desert Day was a simple combination of someone (else’s) poor spelling, and Microsoft’s inability to detect incorrect word usage. If someone knows of a good homonym (or is it homophone) detector, please let me know. Smell that? That’s irony.

Now, on to my dessert:

The recipe for this dessert was originally published in Family Fun magazine, or possibly Family Circle magazine, or possibly Family Circus, or possibly Circus Fun magazine (substitute elephant poop for the chocolate and it totally works!). If you are the copyright holder of this recipe, I apologize for the poor citation.

Despite Drew’s anticipation in the previous post, this dessert is neither vegan (as were my two previous desserts) nor overly sugary. Don’t get me wrong, it is very sweet, but blame that on the ingredients.

You start with 1/3 of a cup of peanut butter. It should be all natural peanut butter. The ingredients list on the peanut butter should go something like “Peanuts, salt”. If the list is longer than that, or contains anything you could not spell during a spelling bee, you bought the wrong kind. My favorites are Whole Food’s grind it yourself peanut butter or Teddie brand, but anything similar will work. Put the peanut butter in a mixing bowl and add 1/3 of a cup of refrigerated sweetened condensed milk. Stir until mixed. Then add 2/3 of a cup of heavy cream and beat with a mixer for a few minutes. The “stuff” should take on the consistency of mayonnaise or pudding.

Set this aside, and melt 2/3 of a cup of fair trade chocolate chips (should be about ½ a cup after melting/licking the spoon several times). Anything not fair trade will explode and possibly burn your house down. Pour the melted chocolate and 1/3 of a cup of refrigerated sweetened condensed milk into another mixing bowl. Stir until mixed. Then add 2/3 of a cup of heavy cream and beat with a mixer for a few minutes. This “other, darker stuff” will not achieve the same thickness as the PB mixture. It should be more like olive oil.

Take the PB mixture and drop dollops of it into a pie crust. Out of sheer laziness, I used a pre-made chocolate crumb crust. You can use anything, but I recommend a chocolaty crust. After you have dolloped about half of the PB mixture into the crust, pour the chocolate mix over it until it’s covered. Repeat the process until you have used up all of both mixtures or your spouse/significant other intervenes.

Top the pie with something fun like the remainder of the chocolate chips, crushed peanuts, or diced artichoke hearts. Put it in the fridge or freezer to set. It can be eaten frozen straight from the freezer, but I prefer to let it warm up to room temp, at which point it will regain it’s pudding like consistency. Top with your favorite non-gelatinous whipped cream (sorry “Cool-Whip”, you’ve got way too many ingredients for my diet).

For best results, freeze the pie overnight, then strap it to the tank of your motorcycle and bomb down the highway for 30-45 minutes. Nothin’ makes a pie taste better than a few bugs in your teeth.

Jon, you’re up next. Well rested after more than a week in Cali, you better bring it!

Tuesday, August 19, 2008

Raspberry Granola Bar Surprise + Blueberry Buckle!


Healthy Desserts?

I would like to preface this post with a few notes and excuses. I would like to apologize for the tardiness of this post. The excuses are as follows: this is my first blog (go easy on me), I couldn’t find the author invitation (Jon hid it in my gmail account), and apparently I am a procrastinator. Luckily for everyone’s taste buds, Nicki doesn’t procrastinate nor need any excuses. Additionally, this only my interpretation of Nicki’s dietary information.

This week Nicki and I chose to make a Raspberry Granola Bar Surprise and a Blueberry Buckle due to our love of desserts with fruit (similar to Dags’ love for sugar, Tristan’s love of vanilla, and Dubs’ love of estimating). I made two desserts because I am an overachiever (or because my fiancé is a dietitian who likes to bake).

Since Nicki is a dietitian, our desserts usually contain things like whole wheat flour, yogurt instead of sour cream, and apple sauce or fruit preserves instead of oil. These substitutions come with many exceptions, and in these desserts, the exceptions are both butter and canola oil. Butter was needed in the Blueberry Buckle in order to get a proper mouth feel of the crumb topping and to keep the cake heavy. Canola oil was used in the Raspberry Granola Bars in order to make them crispy. Canola oil has a healthy fatty acid profile, has omega 3, and is mild tasting (props to Nicki).

The dessert pictured to the left is the Raspberry Granola Bar Surprise. This was created with whole wheat flour, canola oil, eggs (from Briggs Farm in PA), cinnamon, brown sugar, almond extract, raspberry preserves (also from Briggs Farm), and chocolate chips. The dessert pictured to the right is the Blueberry Buckle. This was created with white sugar (yeah Dags!), all purpose flour, butter, eggs, cinnamon, vanilla extract (yeah Tristan!), and about 1892 blueberries (is this close enough Dubs?). It also has a topping of brown sugar, whole wheat flour, and butter. This is called a buckle because there are so many blueberries and such a heavy crumb topping that the batter buckles in the oven while it bakes.

You’re up Dags. I look forward to some vegan sugary goodness.

-Drew